Building a website and then making it available to the public can be a stressful process. There are multiple questions that you have to answer and multiple challenges that you have to solve along the way. Having a tested, proven web design process of going through all that can help a lot.
Here at Brainstorm Force, we’ve worked on hundreds of client sites and dozens of our own sites since 2009. During that time, we’ve crafted a design process that allows us to get through a project with minimal stress while also having the crucial phases all taken care of.
If you’re a freelancer working on client sites or a business owner trying to get your own site launched to the public, you will enjoy this. Here’s our proven, 7-step website design process that helped us build 525+ websites:
STEP 1: Goal-setting
This might sound like a cliché kind of statement, but please bear with me; what I’m about to say really does work:
Set a goal
You must set a goal for your websites.
Yes, goals do work. A couple of reasons for that:
(a) A goal keeps the focus clear.
It’s all too easy to go out chasing the next shiny thing when you’re building a website. You can always add this one more effect, that one more picture, this one more slider, or that one more feature … but should you?
If you’re not solid on what the primary goal of the site is then you can’t make a reliable decision on whether you should include something on the site or not.
With good goals in place, you can always evaluate if this or that feature is going to fit the site.
(b) A goal helps you decide if the design is a success.
If you don’t know what you want to achieve, then how will you know if and when you’ve achieved it?
Once you set a concrete, understandable goal, you will be able to tell if the final site brings you closer to it.
(c) When you have a goal, you can plan the steps to get to it.
Starting with a blank screen is tough. You can go in all sorts of different directions, and you have no way of knowing which is the right one. Or do you?
Setting a goal gives you a very clear road sign that’s pointing you exactly where you need to go from start to finish.
So, how to set that one main goal for your website?
Please notice me emphasizing the word “one” – as in, your website should have just one main goal. Not multiple goals.
Think of it this way: what is the main thing that you want your website to do?
- Do you want it to sell a product?
- Do you want it to build your brand?
- Do you want to raise awareness for a cause?
- Are you running for office?
Whatever that might be, pick one thing, put it in a sentence and phrase it in a way that the goal can be later evaluated and measured.
For example:
“The goal for the site is to grow my sales from X / month to twice that.”
From that point on, you can start evaluating all decisions about your website by answering the question of, “Does this help me 2x my sales?”
Look at websites you like
Your competition is always the best source of inspiration you can get. Start by looking at websites you like in your niche, as well as outside of it.
Take notes relating to what you like about those sites specifically.
- Use screenshot tools like Lightshot to capture specific areas of the site and annotate those screenshots.
- Make those notes relate to your goals. Only take note of things that can likely help you reach your goals.
List your must-have pages
Some pages should find their place on most types of websites. These are the pages that make your goal possible.
List those pages in written form.
Why written? It’s going to be much easier to keep track of those pages when they’re written down, and you can also treat that list as a checklist during development.
Further, go a bit deeper and list the individual sub-goals for each page, plus how the page is going to achieve it. For example:
“About page. Meant to build my brand, get the user familiar with it, build authority and then drive people to the product pages. The page needs social proof elements such as testimonials and brand logos to help achieve this. Also, a clear listing of the top products at the bottom.”
List all necessary functionality
Every website needs its own set of must-have features and elements that will contribute to the main goal.
Let’s start with the things that basically all websites need:
- Blog module – even if you’re not planning on blogging, a blog module is mandatory these days; if not for anything else, you will be able to use it for company announcements
- Contact forms – contact forms play an important role when you want users to get in touch with you through the website.
- Social media integration – either in the form of social media buttons under your products and content, but also in the form of automated content sharing to your own social media profiles
- SEO features – at a minimum, you want to be able to set SEO titles and descriptions of your content and products
- Website analytics – using Google Analytics is the standard
- Comment spam protection – The comments section on a website is more prone to spam. It is important to protect this section on your website.
- Newsletter module – either in the form of simple email collecting module (to get emails into a third-party tool) or a full newsletter module on the site itself
- Backups – you always want to have access to fresh backups of your site in case of emergency
- Cookie notices – you need those if you’re going to be showing your site to visitors in the EU
- Security mechanisms – tools to keep your site safe from attackers and malicious scripts
Other features you might need:
- e-commerce module – a whole feature-set to turn your website into an e-commerce store
- Live chat functionality
- Calendars and appointment booking
- Membership module or online course module
- Banner and ad modules
This list is by no means exhaustive, but it is enough to get you thinking and probably add a thing or two (or ten) of your own.
Translate those features into plugins
I’m going to assume you’re using WordPress as the main engine of your website. As we all know, the main thing that makes WordPress awesome are the myriads of plugins that can turn your WordPress website into anything you need it to be.
The thing to do now is going through your list of must-have features and assign a plugin or two to each feature.
Some features will require more than just a plugin. For instance, when it comes to email lists and newsletters, you might want to use Convert Pro to get the emails, but then you need to transfer those emails somewhere – to a place like MailChimp or an alternative.
At this stage, you should have a fairly complete list of plugins that you’re going to use. The point here is to not end up with a big nasty gap.
You don’t want to find out that you don’t have a straightforward way to get a feature taken care of. If that happens, later on, you might have to go back and rethink the whole approach from scratch.
STEP 2: Branding
Working on your branding elements is probably the most fun part of the entire website design process!
We all love picking a name, comparing different color options, fonts, and, above all else, getting a logo designed! Nothing feels as good as looking at some logos in the morning, though I might be getting too carried away…
Okay, let’s systematize things a bit:
Go with name and domain first
Your domain name pretty much dictates everything else.
- You don’t want to end up with a domain name that’s significantly different from your product or business name.
- You don’t want to be forced to go for a weird TLD (domain extension) just to be able to use your business name.
- You don’t want to get a domain name that’s easy to confuse. For example, rosas.cafe vs. rosascafe.com. Both are existing websites, and yes, both lead to different cafes.
Start by listing all the names that come to your mind and make that the seed of your domain search.
You can check which of these names are available either via Lean Domain Search, which will also suggest some other domain options by adding various words to your seed phrase or via GoDaddy, which has a great selection of TLDs above just the standard .com.
While on the topic, don’t forget that you can now take advantage of modern TLDs like, .blog, .city, .art, .design, .store, provided that they fit the purpose of your site.
Once you see a domain you like, register it immediately. Also, these days, it’s not as important to hold every possible TLD version of your domain, so you no longer have to be getting SITE.net, SITE.org, and so on.
Define your brand identity
This is about your brand colors, fonts, and all things related.
If you’re confident with those things and have what some people call a “visual muscle,” then you can set out to work on brand identity yourself. If not, then help yourself to the services of professionals from Freelancer or Fiverr.
The end product here is (at least) a color scheme that you’re going to use on the site. Having the color scheme and your brand identity right now will make all further work on the site more straightforward.
Get a logo
These days, it’s really easy to get a professional logo designed or even to get one generated via an online tool.
- If you want to have a professional work on your logo, go either to 99designs, LogoContest, or Freelancer.
If you want to work with some online tools on your own, try out Looka or Hatchful.
STEP 3: Website Copy
Most people leave their website copy for last. This is not a good idea.
If you don’t create the written content of your pages at the early stages, then you’re making the further web design steps more difficult.
Without clearly defined content, it’s going to be much harder to structure the design and make sure that things will fit. You’re basically doing too much “thin air design” – designing without anything factual to actually put on the page. This is how you end up with a design that looks great but is completely not functional.
Create content for your must-have pages
Look at what the competition is doing and try to emulate to an extent.
Try to think on how you’re going to structure the pages and where you’re going to put things specifically.
Not sure how to start? Take a look at our catalog of starter templates and draw inspiration from that. Browse through the designs and pages you like and think about what content of your own you could place there.

While you’re doing this, keep in mind your main website goal and sub-goals for each individual page.
Think about your homepage
Your homepage is the most important page on your website. It’s easily the most popular page and also the one that gives you the most leverage in terms of directing your visitors to other areas of the site.
List the elements that you want to feature on the homepage and think about the spots where you want to show them.
Again, you can inspire yourself with the starter templates and also your competition and other sites you like. This is where all these notes you took earlier come into play!
Use placeholder content
You don’t need to have each piece of content in its final form 100% ready right now. Some things can be filled in later and don’t have to hold you up at this stage.
You can use placeholder content for things like:
- individual product descriptions if they’re non-crucial to site structure
- the content of your checkout pages and other e-commerce-related pages
- blog posts
- contact info
- menus
- social media links
“Lorem ipsum” works quite good here.
STEP 4: Website Structure
Your website structure is about more than just what can be found on a single web page. This is about how all those pages interconnect and how they take the visitor from place to place, helping them do what they want to do.
In short, think UX (user experience). More specifically, what is it that you want your visitors to be able to do on your site? What sort of experience do you want to provide them with?
The UX talk basically all comes down to your goals and the goals of your visitors, which might not always be the same thing.
Start with the goal that you’ve set for the site earlier on. You’re going to build the site’s structure and keep coming back to that goal all the time. Think, “does that site structure work for what I want to achieve?”
Use web standards
Web standards are your friend!
Web standards have been here for a reason. Things like the shopping cart icon in the top right or a logo in the top bar shouldn’t be abandoned for originality’s sake. No one will admire you for being original and going against web standards. More likely, they’ll be frustrated that they can’t find what they’re looking for where they’re used to seeing it.
Keep the obvious things in obvious places.
Work on how pages will be linked
The way your web pages are linked together shouldn’t be accidental. Good website structure starts by deciding which pages will lead to which other pages, and how easy it’s going to be to get to all those pages.
Start with your goals (surprise!), and make it an effort to minimize the number of clicks it takes to go from the homepage to making that goal a reality.
In other words, how many clicks will it take for a visitor to buy your product?
A common practice is to build your site in a way that guarantees to get from a page to any other page in three clicks or less (not counting the non-public checkout pages).
More than three clicks and you risk that your visitors won’t be able to grasp what’s going on. Worse yet, Google might face similar problems as well; not good for SEO.
Whip out your notepad again and sketch a diagram of how all your most important pages are going to be connected. Draw simple lines from page to page (to symbolize a link). Here’s an example:
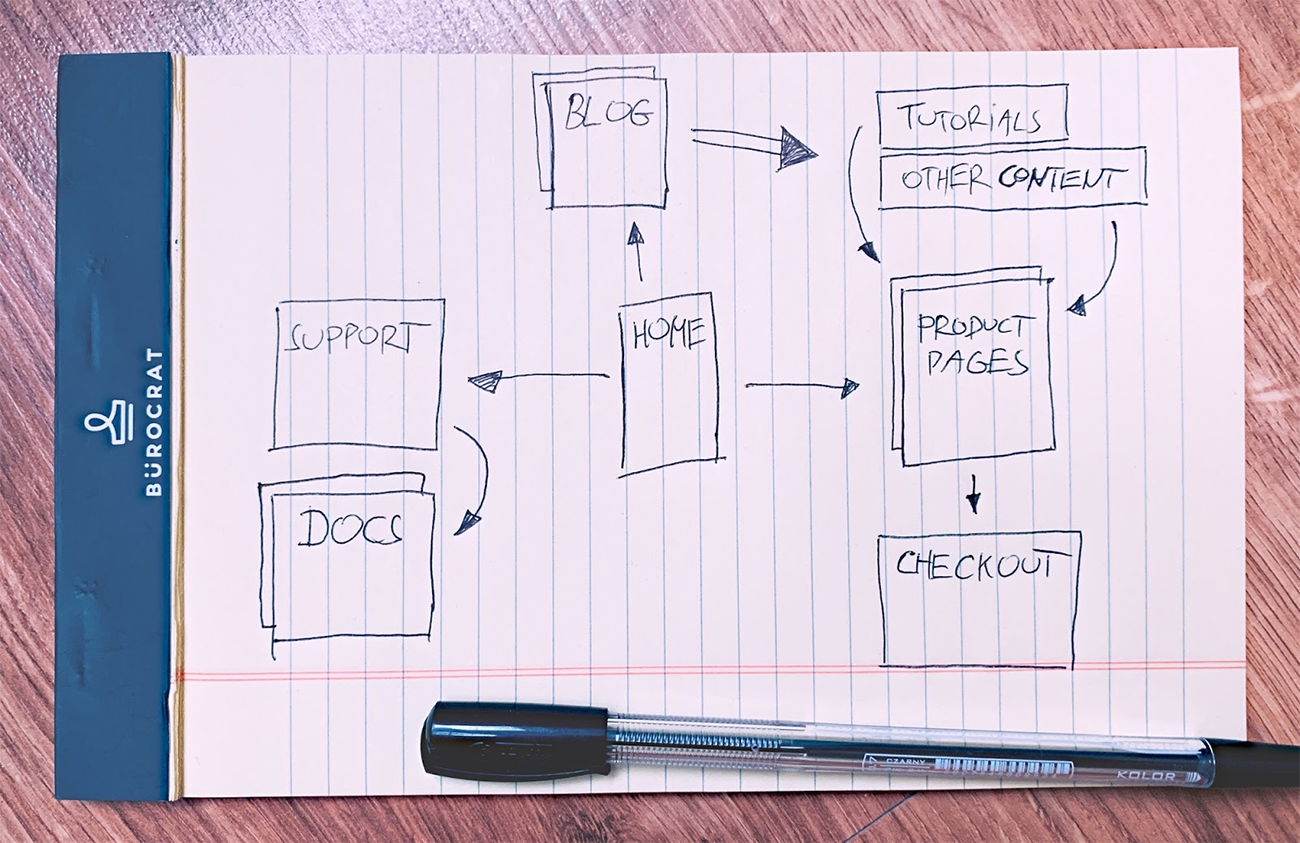
As you’re doing this, make sure that your key goal pages are always easily accessible.
Also, this goes without saying, your homepage should always be linked from your logo (except for on checkout pages; you don’t want people leaving those).
Build your menus and navigation
The previous step leads you neatly to working on your menus and how you can build them in a way that makes navigating around the site easier.
Take out your site structure diagram and look for similarities in terms of which pages need to be accessed from where. Based on that, put common links together and group them into menus. As always, you can take a peek at what your competition is doing with site navigation.
A separate challenge is deciding where to place your menus on the pages themselves. Some options:
- The most important menu goes in the header – that’s a web standard.

- Footer menus are commonly your kitchen-sink menus. Every important link should be found somewhere in the footer.
- Page-relevant menus can be placed either below the main head menu or in the sidebar.
About that last thing, what are “page-relevant” menus? Think things like linking to your blog categories or tags. Those links don’t need to be on every page. They’re going to be the most useful ones on the blog listing page.
With all this done, you can now start working on what all the pages are actually going to look like.
STEP 5: Mockup
A mockup is a model of your design. It’s basically an intermediary step between a blank screen and the final design in all its glory.
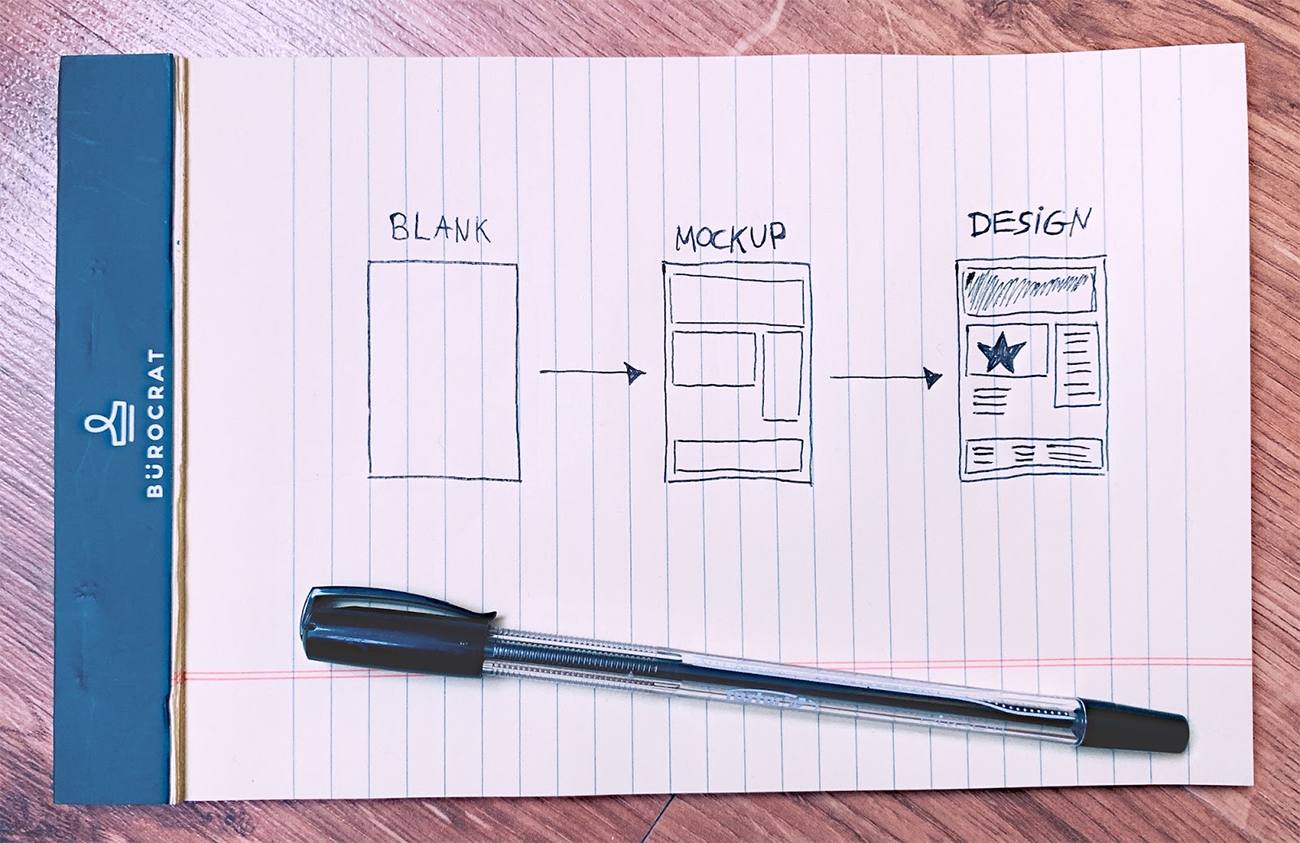
The benefit of using a mockup vs. skipping the mockup phase and designing in your page builder of choice from the get-go is that you can spend some quality time focusing on the bigger picture.
This allows you to make sure that your page structures follow the right principles and that your goals get sufficient attention. With the mockup, you’re creating the scaffolding on the basis of which you’ll build your design later in the process.
That way, you’re not throwing yourself right into working on the fine details of the design. If you were to do that, you’d probably fall for the trap of spending too much time on pixel-perfecting the individual design elements, and not looking at the bigger perspective of how all these elements bring you closer to your goals.
We advise crafting your mockups in a tool like Moqups.com. You can test it out for free – it lets you create one project (limited to 200 objects) and use 5MB of storage. Moqups is easy enough to use so that you can begin building your pages quickly, rather than spend time figuring out the software.
When it comes to the mockup itself, you should make sure to:
- Focus on your goals and the experience your visitors get with the site
- Remember that the mockup is where you only plan out the structure of your pages – what to put on them, and how they should be interconnected
- Take the bird’s-eye view and not get into the details of the design
- Keep things simple
Build a mockup for each page type
Not every page on your site is going to be 100% original. Some pages will look very much alike – just featuring different content. Therefore, what you want to do is create mockups not as much for all pages, but all page types.
In most cases, you’ll want to create mockups for:
- Homepage
- About page
- Product page
- Other key pages that require original design – things like landing pages
- Blog post listing
- Single blog post
- Standard page – a generic page that doesn’t require any significant design elements
When it comes to how to go about crafting your mockups, you don’t have to stress too much about it. Just focus on the principles:
- Put the main navigation elements in place (tools like Moqups offer a set of common website elements that you can just drag and drop into place).
- Think goal-first. Keep key content above the fold. Make sure that the most visible elements on each page make your goals possible, and that they are easy to grasp and not confusing to the visitor in any way.
- Look through the websites of your competitors (again). When doing so, scale down your browser zoom to 50% or less (in Chrome, press CMD and – on Mac, or Ctrl and – on PC). This will allow you to have a broader look at the structure of the pages rather than their individual design elements.
- Build your mockups in black and white. This will speed things up considerably.
STEP 6: Design & Develop
Finally, it’s time to get hands dirty and build some websites!
At this stage, the path is pretty much set by all the steps that came before. You have your goals. You know who your audience is. You know who the competition is. You have your mockups and your navigation structure ready. You have your brand identity, color scheme, and logo. It’s high time to put all these things to work!
There are a couple of ways you can approach this task:
(a) code things by hand, from the ground up
(b) use page builders and a framework theme for WordPress
As you’d expect, we prefer the latter – being that you’re reading this on the website that’s home of the Astra theme. But the choice is up to you; we don’t insist.
The main benefit of opting for Astra is that you can build your design without having to get into the source code, plus you can choose from a range of pre-built websites. Those starter templates are not built in any arbitrary interface of Astra’s, but in the popular page builders, so you can still use your favorite such builder.
Setting the design aside, this is also the stage where you’ll be installing all the plugins you listed before and making sure that they work properly.
Luckily, since WordPress is so popular and a fairly advanced online tool, we hardly ever see any serious problems with its core functionality, or with the core functionality of plugins such as WooCommerce. In other words, your orders will probably work just fine, since thousands of people have tested them before you.
Still, make sure to spend sufficient time testing the elements that are key to your goals.
Also, check if your site works on desktop, tablet, and mobile. Don’t only test things by resizing your browser window back and forth, but use some actual tablets and different mobile phones to see how your site looks. If you want to go even further, use a tool like LambdaTest – a great cross-browser testing tool. It has a free plan.
STEP 7: Go Live
It’s time to make your site visible to the public!
First – the boring part – install your site on your final production server. Also, hook up the domain name if you haven’t already.
If you’ve been developing your site locally then you can use a plugin like Duplicator to move it to production. Some hosts also offer their own migration services or recommend using specific migration plugins. It’s best to stick to those recommendations. Check with your host’s documentation.
With that done, it’s time to do a series of final checkups and make sure that you’re setting your site up for success and not leaving any important matters unattended. Which brings us to:
Your website launch checklist
We’ve prepared a checklist of the things worth looking into after you’ve made your site public. See it here.
There are 30 items on the list, which may seem like a lot, but getting through them shouldn’t take you too long. Plus, doing so is really worth the effort.
Tweak and improve
You’re never 100% done with your website development or design. There’s always room for improvement, but that’s unfortunately not something you can do until you let your website run for a while.
During the initial stages of your site’s lifespan online, acquire data on how users interact with it, and even get some direct feedback from those users if possible. You can do that by setting up polls/surveys on the site. There are more than a handful of plugins that make that possible.
Think of this version of the site as Stage I – it’s the stage of “best I can do with the data I have.”
What comes next is Stage II – the stage of “best I can do based on the input I get from my users.” Stage II is about going back to your main goals, looking through how achieving them is playing out, and what you can do to improve on things.
Luckily, with tools like page builders at hand, doing any design changes or even whole page overhauls isn’t dramatically time-consuming. Rather, you can redo pretty much any page structure or import a completely new one in a matter of minutes.
Done!
Congrats, you’ve just learned our 7-step process of going from blank to a thought-through website that’s set for success. We hope that this guide will help you get your website projects off the ground fast! ✨
Just to recap, here are all the steps again in an easily-scannable form (click on any given step to scroll to it):
- Goal-setting
- Branding
- Website copy
- Website structure
- Mockup
- Design and develop
- Go live
Looking for the ultimate DIY toolset to get all of the above done fast? Now is the perfect time to give the Astra theme a try. The brand new 2.0 version lets you build websites faster than ever before. Check it out!


14 thoughts on “The Ultimate Web Design Process in 7 Easy Steps”
Very in-depth article Sujay, it was a great read! I think tweak and improve is one of the most important concepts many people forget to implement. It can be tempting to launch a site without testing, and then leave it as. But how would you ever know it’s the best version of your website?
“You’re never 100% done with your website development or design.”
And thanks for the Looka mention. We love your site 🙂
My pleasure, Elijah-Blue 🙂
Well written article.
Most web designers make the mistake of going straight to the designing stage without the mock-up aspect of it. Getting the mockup right speedup the design process.
Mockup, be it hand sketching or using the software is still relevant to date.
You just won a subscriber!
Yaay! 🙂
nice one
Thanks, Tom 🙂
Really great article. The whole web designing concept explained step by step. Thanks for sharing this with us.
Glad you liked the article, Jason 🙂
Extremely informative, clear and concise. Thank you for sharing.
My pleasure 🙂
Great article Sujay!!
Very in depth and to the point. Thanks for the awesome guide!
it such a wonderful post to read, thank you for sharing experience and ideas.
Good article and excellent way to articulate, keep it up
Thank You! 🙂